Monday, November 27, 2023

"Festive DIY: Creating Stunning Holiday Cards with HERO ARTS Stag Die"

 Festive DIY: Creating Stunning Holiday Cards with HERO ARTS Stag Die


The holiday season is a time of warmth, connection, and the joy of giving. What better way to spread cheer than by crafting your own unique and stunning holiday cards? In this tutorial, we'll dive into the art of creating breathtaking holiday cards using the HERO ARTS Stag Die, adding a touch of elegance and personalization to your greetings.


Introducing the HERO ARTS Stag Die


The HERO ARTS Stag Die is a crafting gem that allows for the creation of intricate and beautifully detailed stag designs. Its precision and versatility make it the perfect element for adding an elegant touch to your holiday cards. With its high-quality construction, it ensures clean, crisp cuts for a professional finish.


Materials You'll Need

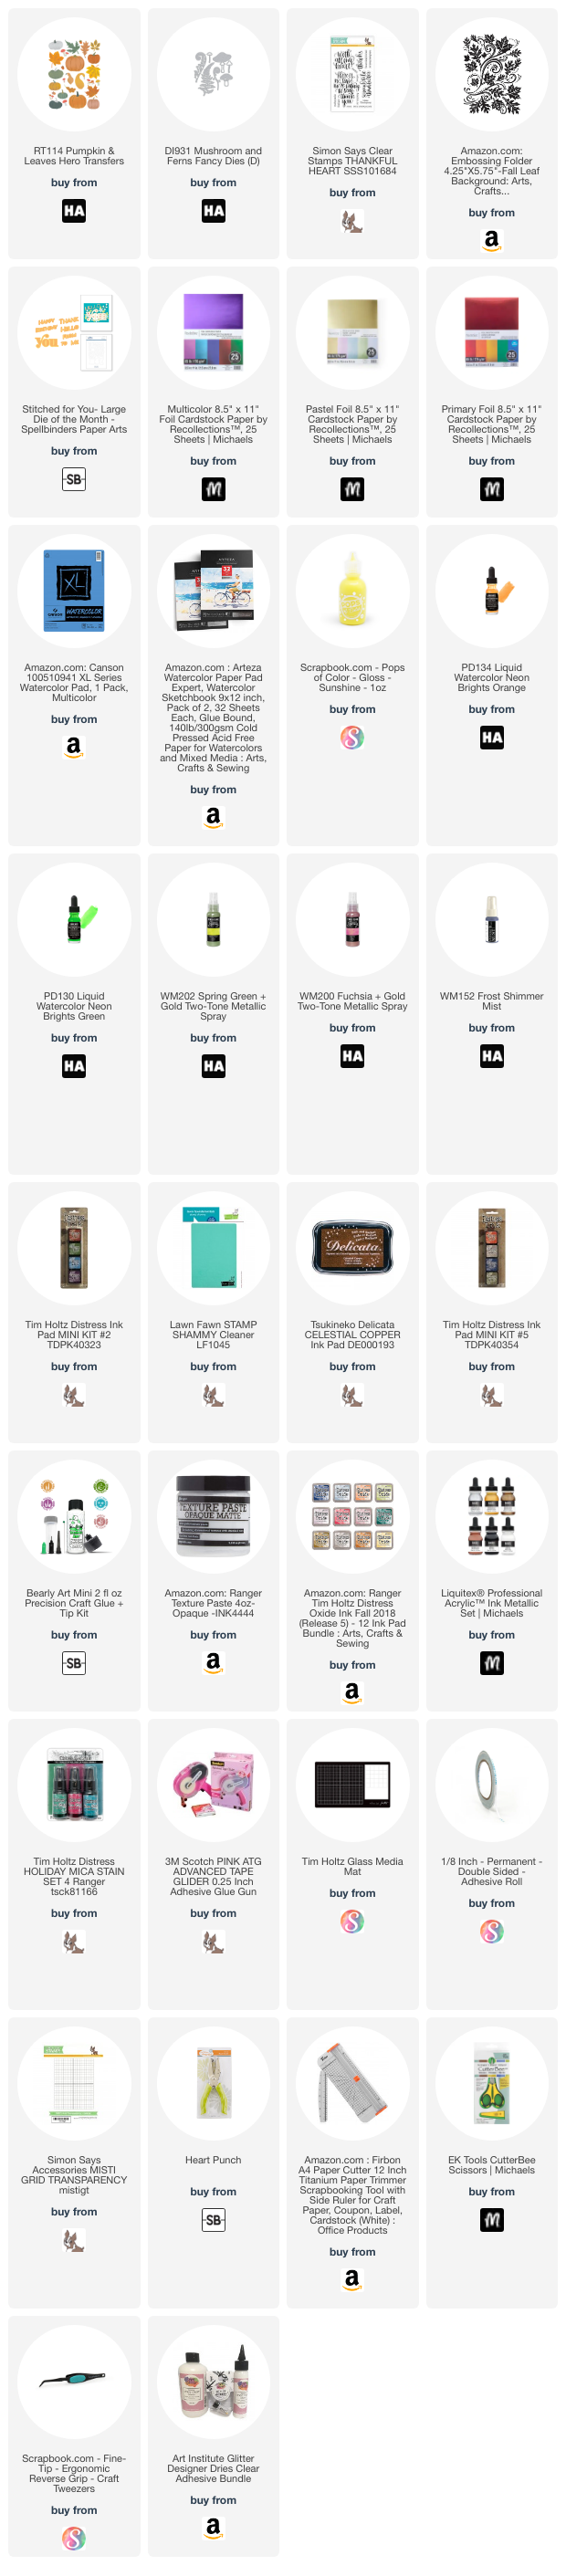
Gather these essential materials to get started:

HERO ARTS Stag Die

Colored or patterned cardstock

Card bases or blank cards

Die-cutting machine

Adhesive

Optional embellishments like glitter, sequins, or metallic pens

Step-by-Step Tutorial on my YouTube channel

"Festive DIY: Creating Stunning Holiday Cards with HERO ARTS Stag Die"


you can see the product details below same time the similar dies whichever you have you can mix and match to do these techniques.

THANK YOU FOR, SUBSCRIBING AND APPRECIATING. Feel free to share this post on social media using the share!


Setting Up: Prepare your workspace with your die-cutting machine, assorted cardstock, and other materials.


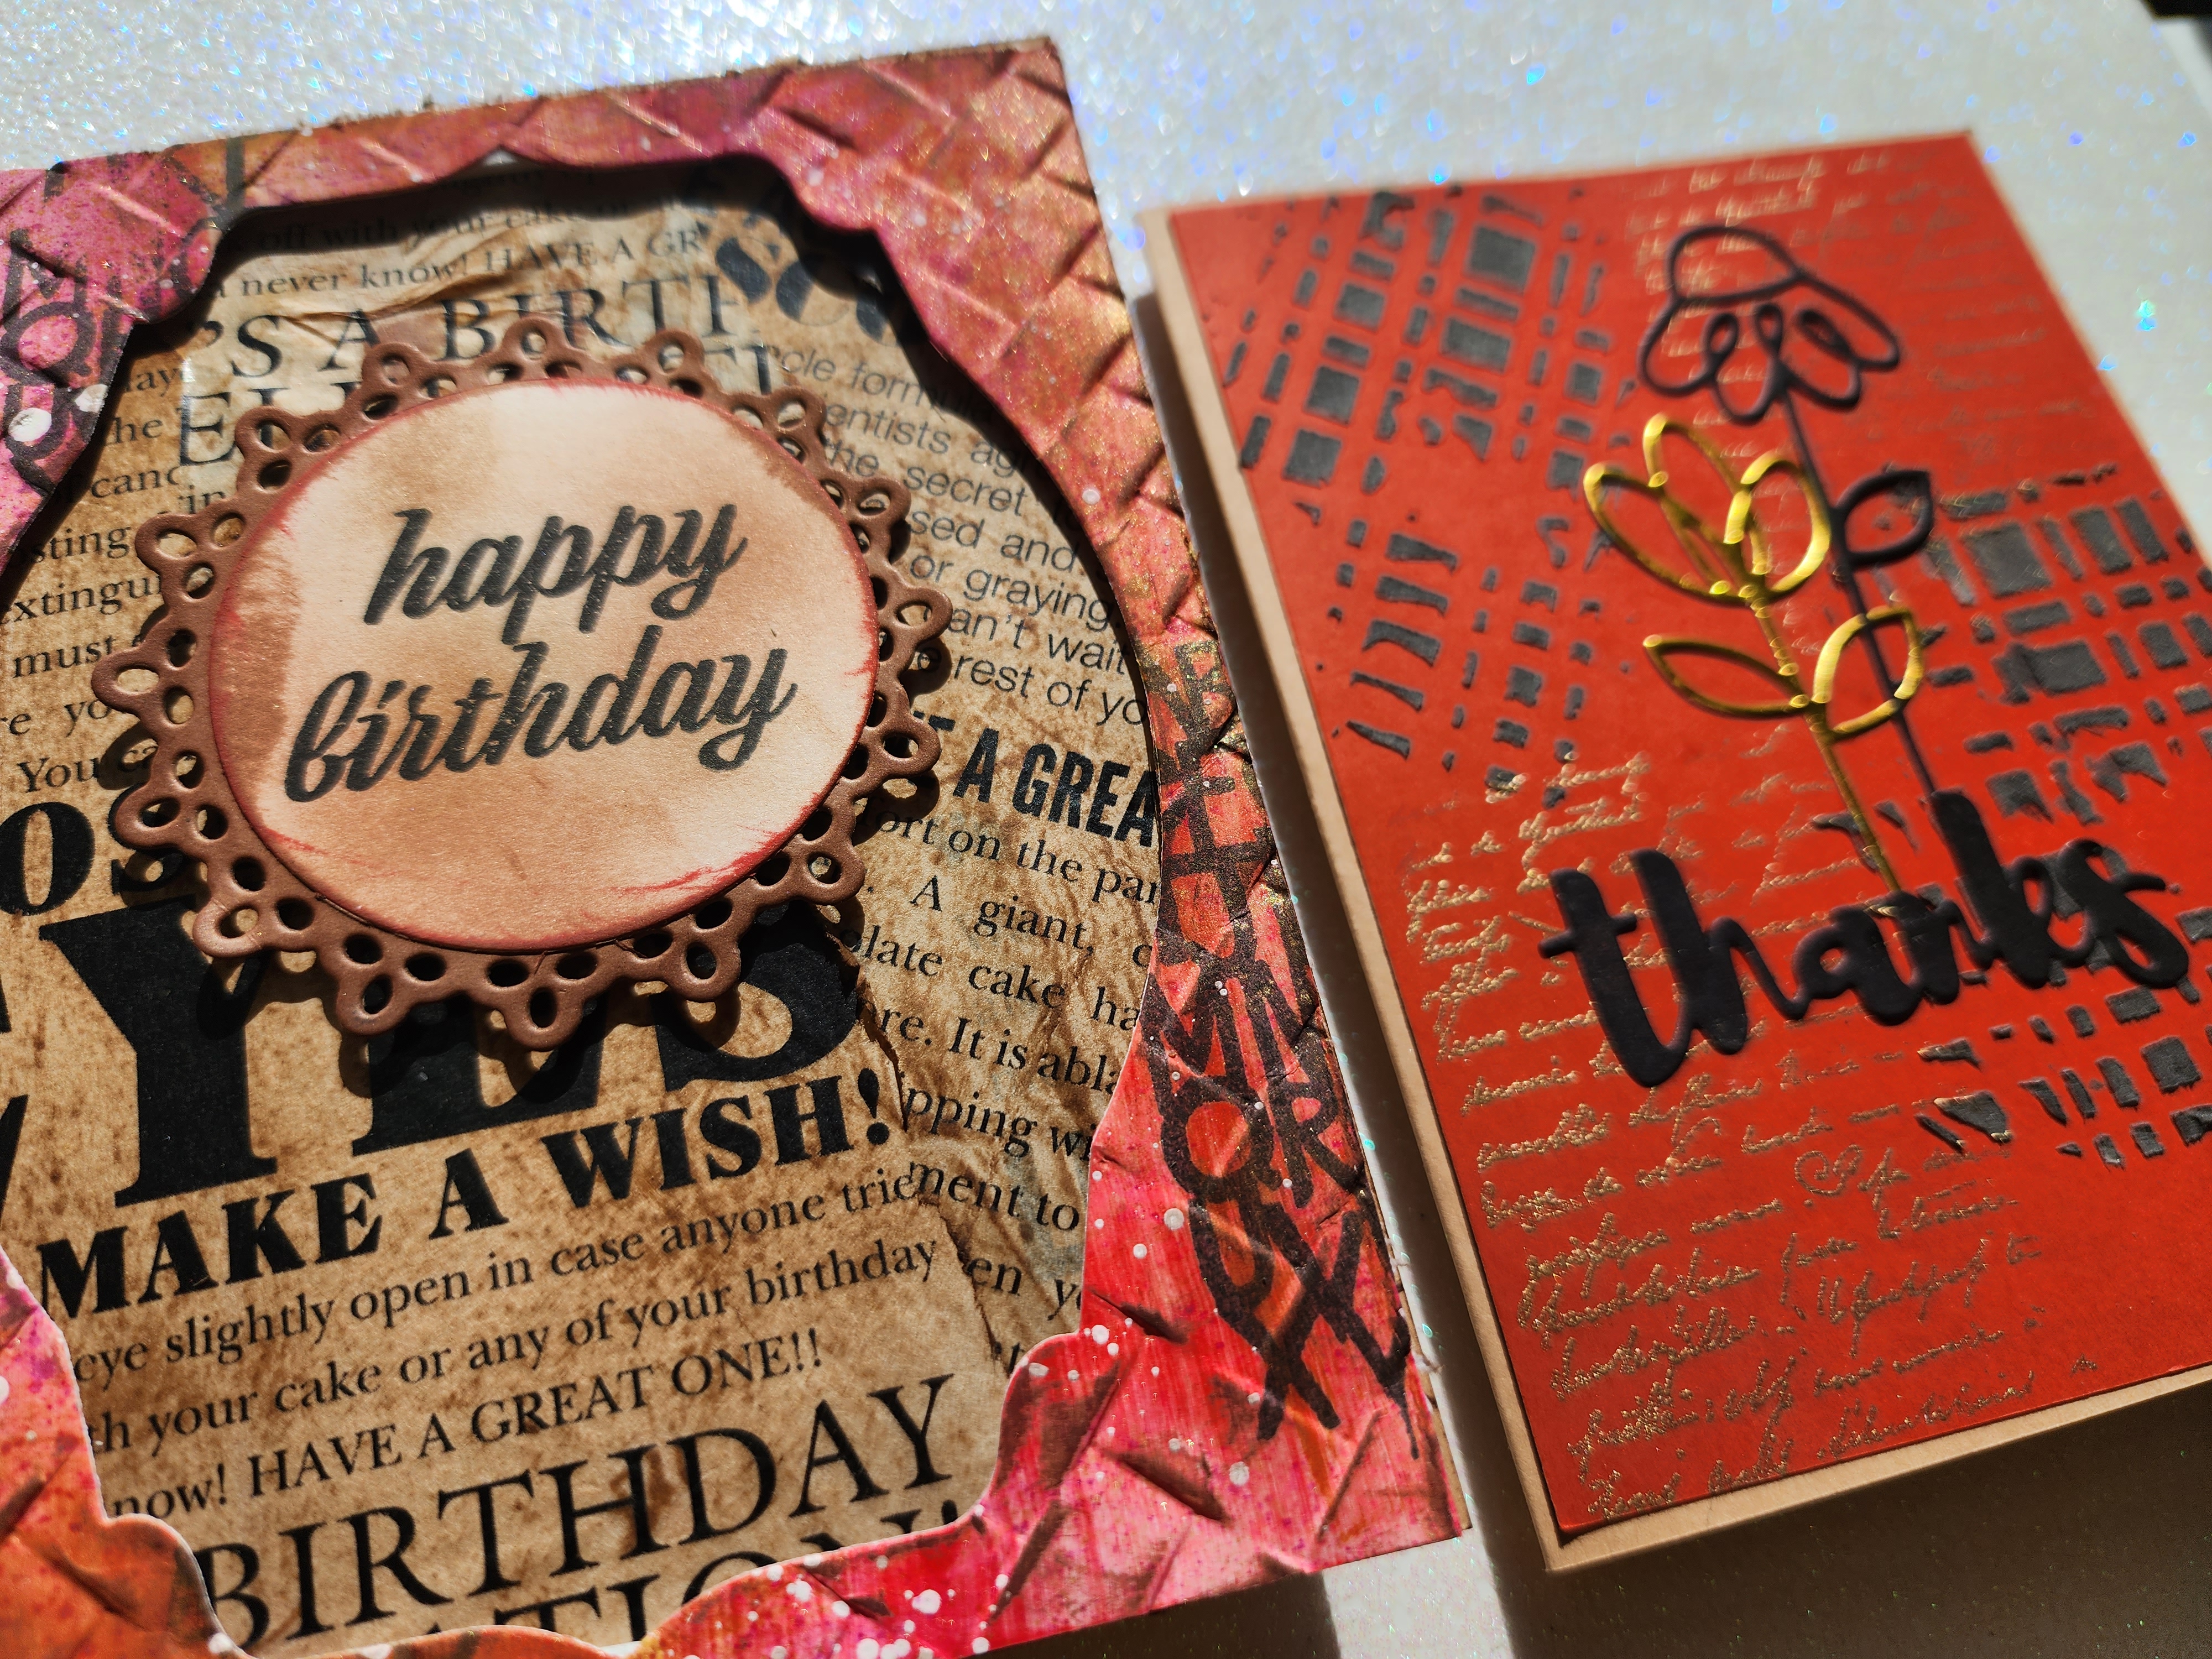
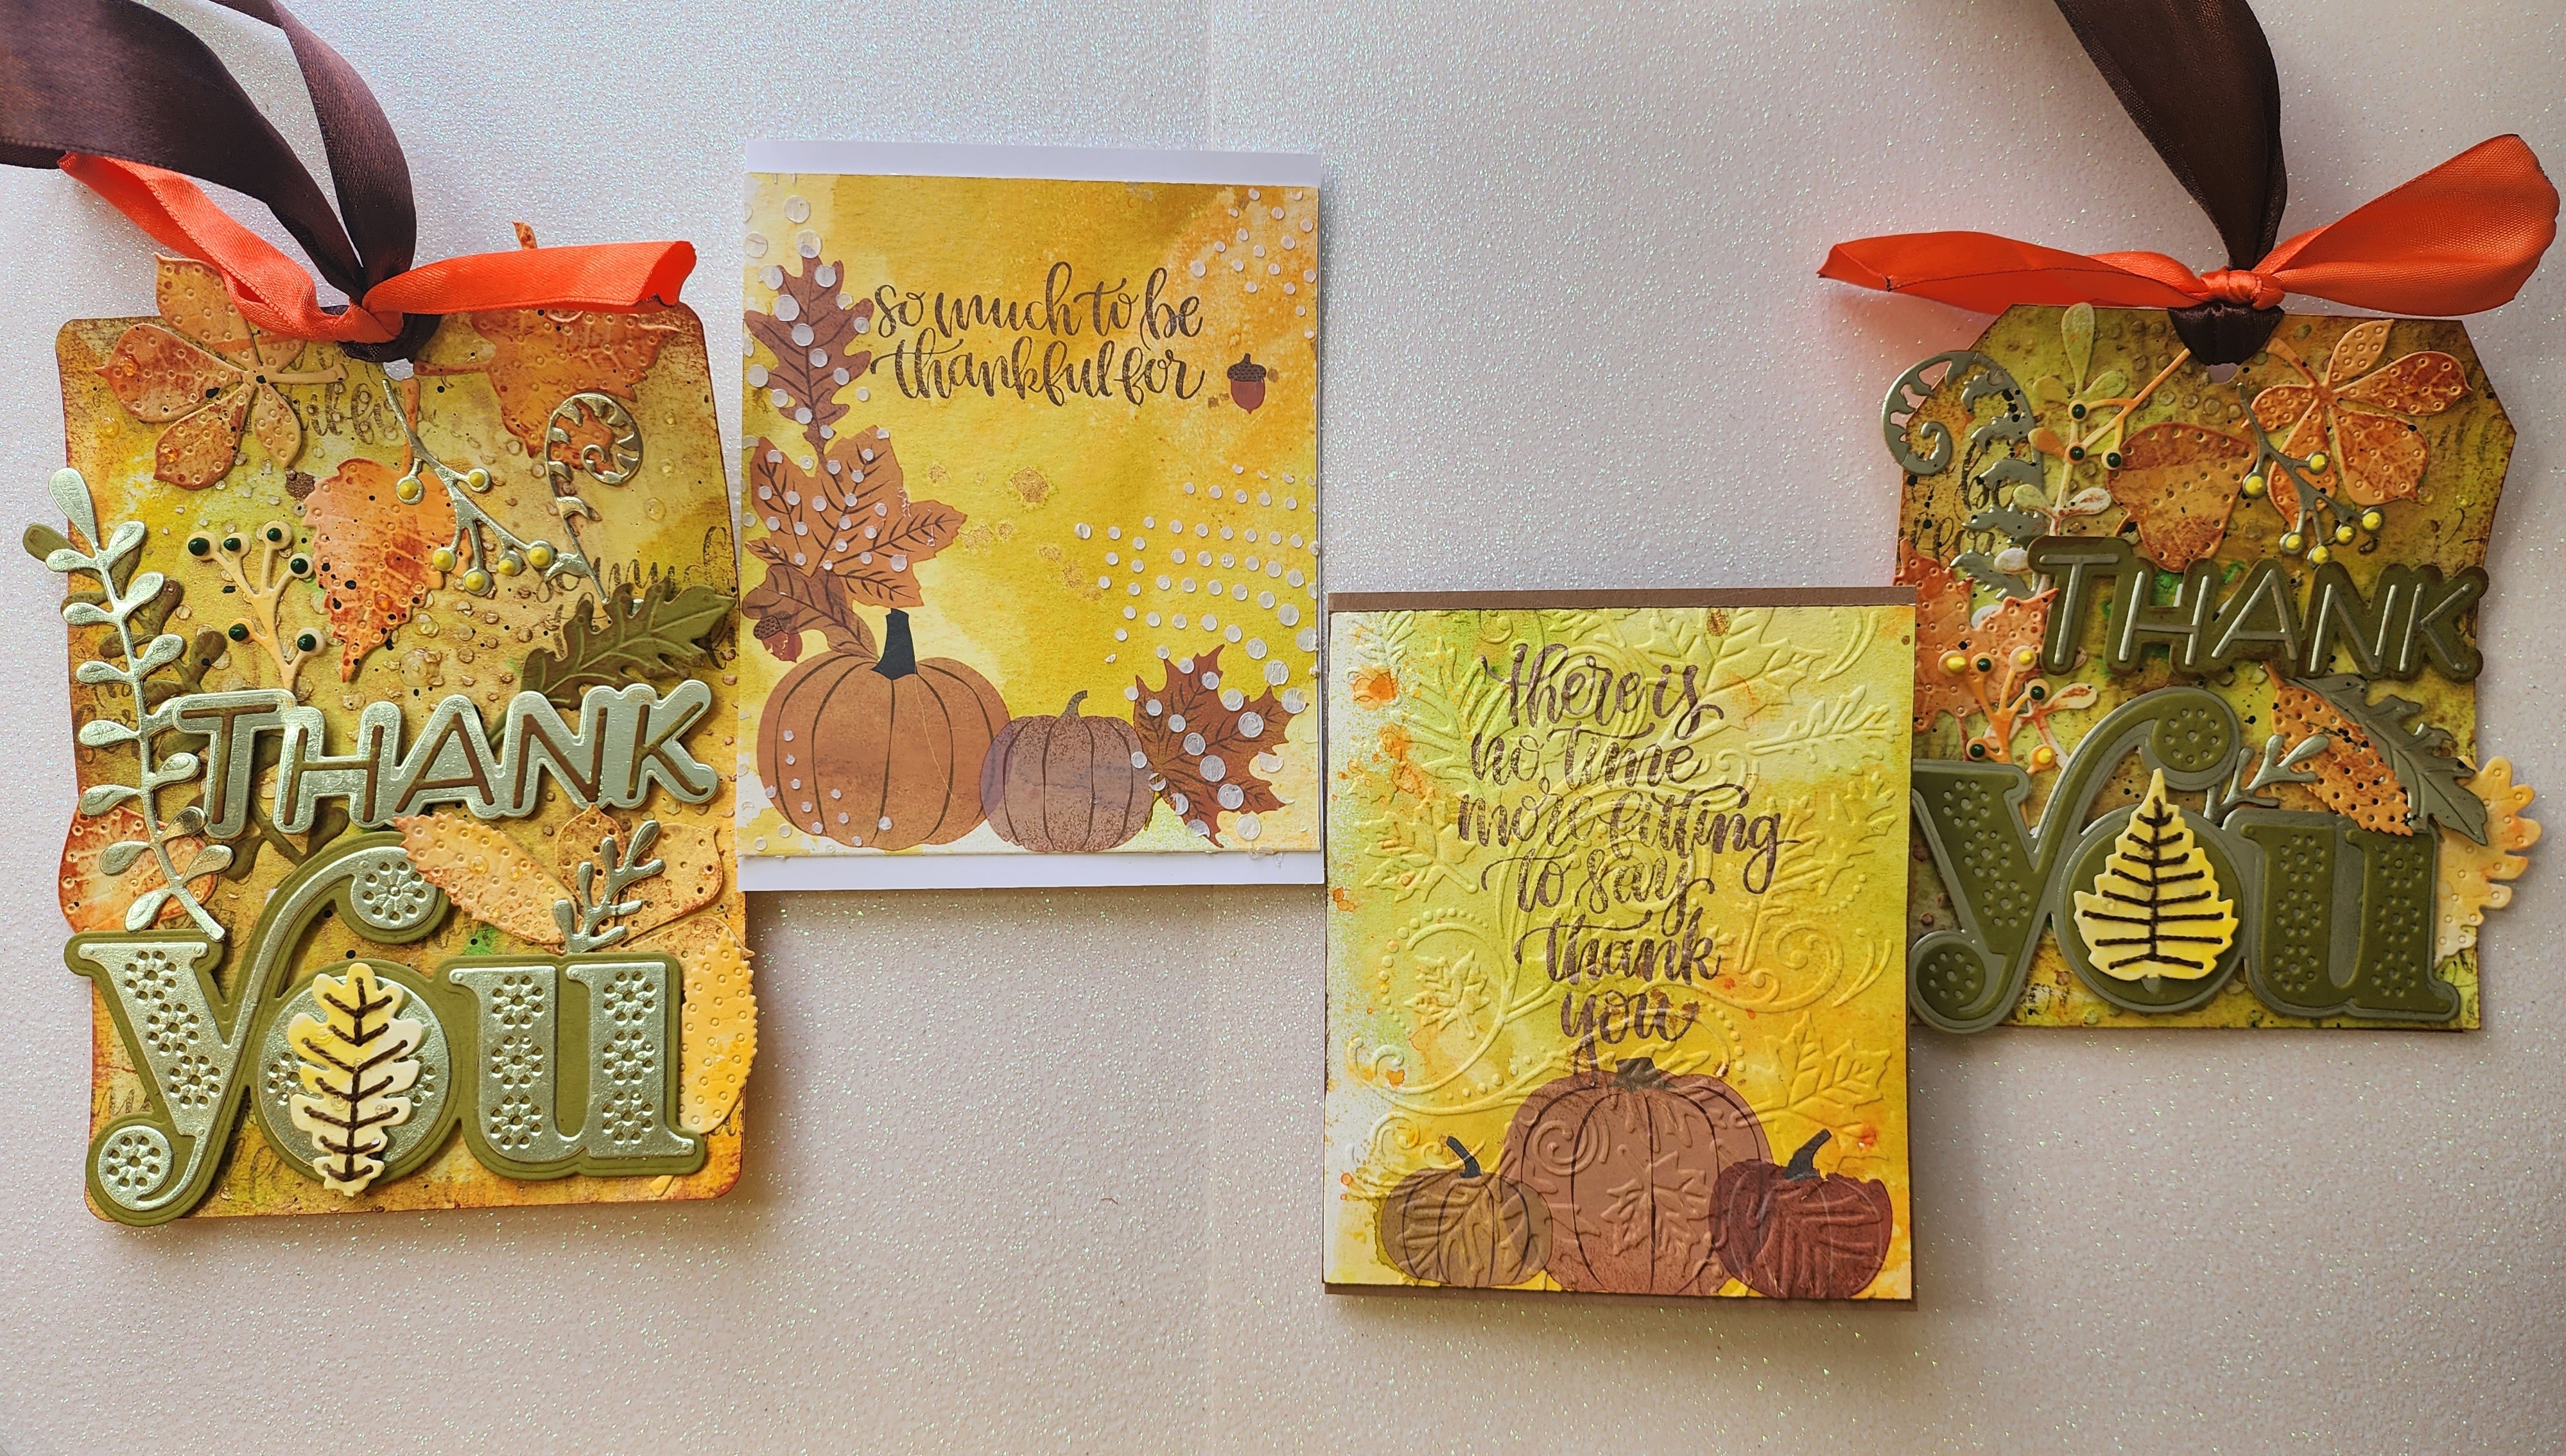
Die-Cutting the Stag: Place the HERO ARTS Stag Die onto your chosen cardstock and run it through your die-cutting machine. Experiment with various colors and textures to suit your holiday theme.


Card Assembly: Once you've cut out the stag shape, carefully remove it from the die. Attach it to your chosen card base using adhesive, considering layering or positioning for an aesthetically pleasing design.


Personalize and Embellish: Add additional embellishments, such as glitter accents, sequins, or metallic pen details, to enhance the beauty of the card. Consider incorporating a heartfelt message or festive greetings.


Final Touches: Stand back and review your creation. Make any final adjustments or additions, ensuring that your holiday card embodies the spirit of the season.


Conclusion

Crafting holiday cards with the HERO ARTS Stag Die is a delightful way to add a personal and artistic flair to your greetings. Each card becomes a unique work of art that conveys your heartfelt sentiments.


This holiday season, embrace the joy of spreading happiness through these handmade cards. Your friends, family, and loved ones will not only appreciate the thoughtfulness of your greetings but also the creativity and effort you put into creating these stunning cards.


Wishing you a season filled with creativity, warmth, and the joy of giving. Happy crafting and happy holidays!

Monday, November 20, 2023

Make Stunning Mixmedia Cards Easily With Masterboard - Perfect For Any Occasion!

Creating Striking Mixed Media Cards with Masterboard: Perfect for Every Occasion!


Are you searching for a versatile and creative way to craft stunning greeting cards for various occasions? Look no further than the captivating world of mixed media art and the ingenious use of a masterboard. Whether you're celebrating birthdays, anniversaries, holidays, or simply wishing someone well, mastering the art of masterboard mixed media cards can help you produce unique, personalized creations.

What is a Masterboard?

A master board is a base made from layers of different materials and techniques, serving as the foundation for multiple cards or art pieces. It's a canvas that allows you to experiment with various mixed media elements like paints, inks, stamps, stencils, and textures. Once the masterboard is created, it can be cut, embellished, and customized to produce multiple unique cards.

you can see the product details below same time the similar dies whichever you have you can mix and match to do these techniques. THANK YOU FOR, SUBSCRIBING AND APPRECIATING. Feel free to share this post on social media using the share!


Materials You'll Need:

Sturdy Cardstock or Watercolor Paper: This will serve as the base for your masterboard.

Acrylic Paints or Ink Pads: Use a variety of colors to create a vibrant background.

Stamps and Stencils: These add texture and patterns to the masterboard.

Embellishments: Sequins, ribbons, washi tape, or any decorative items for added flair.

Markers or Pens: For detailing and adding personalized messages.

Adhesives: Glue, double-sided tape, or glue dots for assembling the cards.

Steps to Create a Masterboard:

Prepare the Base: Start by covering your cardstock or watercolor paper with a base layer of acrylic paint or ink. Experiment with colors, blending, or creating patterns using brushes, sponges, or even your fingers.


Add Texture and Patterns: Use stamps and stencils to create layers and depth on your masterboard. Play with different designs and colors to make it visually appealing.


Embellish: Introduce additional elements like sequins, ribbons, or washi tape to enhance the visual interest of the masterboard. This step allows for personalization and customization.


Let it Dry: Allow the masterboard to dry completely before proceeding. This ensures that your cards won’t get smudged or damaged during the cutting and assembly process.


Cut and Create: Once your masterboard is dry, cut it into smaller sections to fit your card sizes. These smaller sections will form the base for individual cards.


Assemble Your Cards: Attach the masterboard pieces to card bases, and then add any additional personal touches, messages, or embellishments.


Creating mixed media cards using a masterboard allows for endless creativity. The beauty lies in the fact that each card produced will be unique despite originating from the same base.


Conclusion:

Masterboard mixed media cards are an exceptional way to express your creativity and thoughtfulness. Whether it's a birthday, holiday, or a simple note to say "thank you," these handmade cards carry a personal touch that's hard to replicate with store-bought options. Embrace the journey of exploration and experimentation in the world of mixed media art to create one-of-a-kind cards that will be cherished by your loved ones for years to come.

Friday, November 17, 2023

"Stitch & Craft: Handmade Thanksgiving Cards with Spellbinders Mushroom Dies"

 Stitch & Craft: Handmade Thanksgiving Cards with Spellbinders Mushroom Dies


Thanksgiving is a time for expressing gratitude and appreciation, and what better way to convey those sentiments than with a personally crafted card? In this tutorial, we'll delve into the art of creating unique and charming Thanksgiving cards using the intricate Spellbinders Mushroom Dies through a combination of stitching and crafting techniques.

The Beauty of Handmade Thanksgiving Cards

Handmade cards hold a certain charm; they're a heartfelt way to express gratitude and love. This Thanksgiving, let's embark on a creative journey to design cards that encapsulate the warmth and spirit of the season.

Handmade Thanksgiving Cards with Spellbinders Mushroom Dies


Preparation: Set up your workspace with the required materials, ensuring you have a clear and organized area to craft your cards.


Die-Cutting the Mushroom Shapes: Use the Spellbinders Mushroom Dies to cut out the intricate mushroom shapes from your chosen cardstock. Experiment with various colors to complement the Thanksgiving theme.


Stitching Details: With the die-cut mushroom shapes, delicately stitch along the edges or details using embroidery thread and a needle to add a unique and charming touch to your cards.


Card Assembly: Once you've completed the stitching, affix the mushroom shapes onto the card bases using adhesive, ensuring they're centered and secured neatly.


Embellish and Personalize: Add additional decorative elements like buttons, ribbons, or any other embellishments to enhance the aesthetic appeal of your cards. Consider adding personalized messages or sentiments that resonate with the spirit of gratitude.


Final Touches: Review your handmade Thanksgiving cards, making any final adjustments or additions to ensure they capture the essence of the season and your gratitude.


Crafting Handmade Gratitude


Handmade cards represent the time, effort, and love poured into creating something special. They are a tangible representation of the gratitude and appreciation you hold for those you're thankful for.


Sharing the Joy of Thanksgiving


Extend the joy of Thanksgiving beyond the dinner table. Share your gratitude through these handmade cards, spreading warmth and love.


Conclusion


Handcrafting Thanksgiving cards with the Spellbinders Mushroom Dies is a beautiful way to infuse your sentiments into tangible expressions of gratitude. Each card becomes a unique work of art that conveys your heartfelt thanks.


This season, let’s embrace the joy of giving thanks through these handcrafted cards. They'll not only be appreciated but cherished by your friends, family, and loved ones.

Monday, November 13, 2023

"Gratitude in Bloom: Expressive Thanksgiving Cards and tags Spread Thanks"

 Gratitude in Bloom: Expressive Thanksgiving Cards to Spread Thanks


As we gather to celebrate the spirit of gratitude and thankfulness, Thanksgiving serves as a beautiful reminder to express appreciation and love to those around us. What better way to convey your heartfelt thanks than with a beautifully crafted Thanksgiving card? In this post, we’ll explore the art of creating expressive and heartfelt Thanksgiving cards that bloom with gratitude.

Embracing the Essence of Thanksgiving

Thanksgiving is more than a day; it's a feeling, a sense of warmth, togetherness, and acknowledging the blessings in our lives. It's the ideal moment to express gratitude for the people who fill our lives with joy and support.

you can see the product details below same time the similar dies whichever you have you can mix and match to do these techniques. THANK YOU FOR, SUBSCRIBING AND APPRECIATING. Feel free to share this post on social media using the share!

Expressive Thanksgiving Cards and tags Spread Thanks


Designing Your Cards: Start by selecting the base card and then design the layout. Consider incorporating fall colors like oranges, reds, yellows, or earthy tones to capture the essence of the season.

Adding Expressive Elements: Write a heartfelt message or a quote that resonates with the spirit of gratitude. Experiment with calligraphy or different fonts to add an elegant touch.


Embellishing Creatively: Consider adding decorative elements like stickers, dried flowers, or washi tape to make your cards visually appealing and reflective of the autumn season.


Personalizing Each Card: Tailor each card to its recipient, adding a personal touch that speaks to your relationship and what you’re grateful for.


Reflecting the Spirit of Thanksgiving: Before finalizing, ensure that your cards reflect the warmth and appreciation you intend to convey.


The Power of Handwritten Gratitude


A handwritten note is a powerful tool. In today's digital age, receiving a heartfelt, handwritten card carries a profound significance that resonates deeply with the recipient.


Spread Thanks and Gratitude


The act of giving thanks extends beyond a single day. Spread love, appreciation, and thankfulness not just on Thanksgiving but every day. Let your Thanksgiving cards be a reminder of the importance of expressing gratitude and appreciation throughout the year.


Conclusion


Creating Thanksgiving cards is a beautiful way to embrace the sentiment of the holiday. It's an opportunity to pause, reflect, and express gratitude to the cherished individuals in your life.


This Thanksgiving, let's bloom with gratitude by crafting cards that capture the essence of the season and the warmth of our appreciation for the people we hold dear.


Wishing you a season filled with gratitude, warmth, and meaningful connections. Happy crafting and happy Thanksgiving!

Friday, November 10, 2023

Unveiling the Power of Under Paper in Art: A Beginner's Guide

Exploring the Creative Potential of Under Paper in Art: A Beginner's Guide


Artists often discover beauty and inspiration in unexpected places, and the concept of "under paper" is one such hidden gem in the art world. Under paper refers to the sheets of paper or surfaces used to protect work areas while creating art, which inadvertently accumulate diverse and fascinating patterns, colors, and textures as a result of artistic processes. This guide aims to unravel the hidden potential of under paper, offering beginners a gateway to a unique and resourceful artistic medium.


Unveiling the Power of Under Paper in Art: A Beginner's Guide


What is Under Paper?

Under paper is essentially the residual paper used underneath the primary work surface during art creation. This could be the protective layer used to prevent spillage, excess paint, or ink from soiling the table or the back of a sketchbook while working on other pieces. Over time, these sheets accumulate a rich amalgamation of colors, strokes, splatters, and marks, forming a vibrant and visually compelling foundation for new artwork.


Materials You'll Need:

Under Paper Sheets: Collected from previous art projects, these can range from blank paper to newspaper, parchment, or any protective covering used during art creation.

Acrylic Paints or Ink: For adding colors or textures to the under paper.

Brushes, Sponges, or Palette Knives: Tools for applying paint or creating various effects.

Markers, Pens, or Pencils: For outlining, detailing, or adding finer elements.

Adhesives: To affix the under paper to other surfaces if desired.

Techniques for Using Under Paper:

Collect and Explore: Gather your used under paper sheets and assess the patterns and colors present. Each sheet holds a unique assortment of accidental art waiting to be discovered.


Enhance and Modify: Add layers of acrylic paint, ink, or other mediums to accentuate the existing patterns or create new ones. Experiment with different techniques like splattering, blending, or using stencils to further enrich the underpaper's visual appeal.


Cut and Collage: Cut the under paper into shapes or patterns that can be collaged onto canvases, sketchbooks, or other surfaces. This technique allows the underpaper to become an integral part of a new artwork.


Combine with Traditional Art: Incorporate the under-paper elements into your traditional artwork by using them as backgrounds, borders, or intriguing focal points within your piece.


Embrace the Imperfections: The beauty of under paper lies in its unpredictability. Embrace the accidental marks and patterns as they add character and uniqueness to your artwork.


Conclusion:

Under paper presents an exciting opportunity for artists to repurpose accidental beauty into intentional art. It's a sustainable and budget-friendly way to infuse depth, texture, and uniqueness into your creations. As a beginner exploring the art world, leveraging the potential of under paper can lead to unexpected and delightful outcomes, fostering a deeper understanding of artistic expression and resourcefulness. So, don't discard those protective sheets—unleash their hidden potential and let them breathe new life into your artistic journey.


Friday, November 3, 2023

LET'S STAR THE GELLI PRINT ART

 STEAP BY STEAP GELLI PRINTS


Creating Gelli prints is a fun and creative process that allows you to make unique, colorful, and textured prints. Here's a step-by-step guide to creating Gelli prints:


Materials You'll Need:


Gelli Plate: This is a reusable, gel-like printing plate.

Acrylic Paints: Various colors of acrylic paint.

Brayer: A roller used to spread paint evenly on the Gelli plate.

Paper: Use high-quality paper suitable for printmaking, such as printmaking paper or heavy cardstock.

Palette: For mixing and holding paint.

Stencils, Texture Tools, or Found Objects: These can be used to create interesting patterns and textures.

Apron or Old Clothes: Acrylic paint can be messy, so wear something you don't mind getting paint on.

Step 1: Set Up Your Workspace


Clear a clean, flat surface where you can work.

Lay down some old newspapers or a plastic sheet to protect your work surface.

Step 2: Prepare Your Paints


Squeeze small amounts of acrylic paint onto a palette. Use a variety of colors to create interesting prints.

You can mix colors on the palette to create custom shades.

Step 3: Roll Out the Paint


Use a brayer to roll a thin, even layer of paint onto your Gelli plate. Make sure the plate is completely covered with paint.

You can use one color or multiple colors at this stage, depending on your design.

Step 4: Add Texture


Now comes the fun part. Use stencils, texture tools, found objects, or your fingers to create patterns and texture on the paint-covered Gelli plate.

Press these objects onto the plate gently to transfer their texture to the paint.

Step 5: Make the Print


Quickly place a sheet of paper on top of the painted Gelli plate.

Press down evenly and firmly with your hands, ensuring that the paper makes good contact with the plate.

Carefully lift the paper to reveal your Gelli print.

Step 6: Reveal Your Print


You'll see the design you created on the Gelli plate transferred to the paper.

Admire your unique print, and allow it to dry.

Step 7: Clean the Gelli Plate


After making a few prints, clean the Gelli plate by wiping off the paint with a damp cloth or baby wipe.

You can reuse the plate for more prints.

Step 8: Experiment and Create More


Repeat the process with different colors, textures, and techniques to create a series of Gelli prints.

Experiment with layering prints and combining various techniques for even more creative results.

Creating Gelli prints is all about experimenting, having fun, and embracing the unexpected. There are no rules, so let your creativity flow and see where it takes you. Enjoy the process, and don't be afraid to try new things and explore different techniques to create stunning, one-of-a-kind prints.